Understanding Roof Pitch: Measurement, Conversion, and Material Selection
A roof pitch calculator converts between the different ways builders and roofers express slope — X/12 ratio, degrees, percentage, and decimal — so you can pick the right materials, estimate surface area, and communicate with contractors without confusion. Pitch is one of the first numbers you need for any roofing project, and getting it wrong means ordering the wrong materials or failing an inspection.
What Is Roof Pitch?
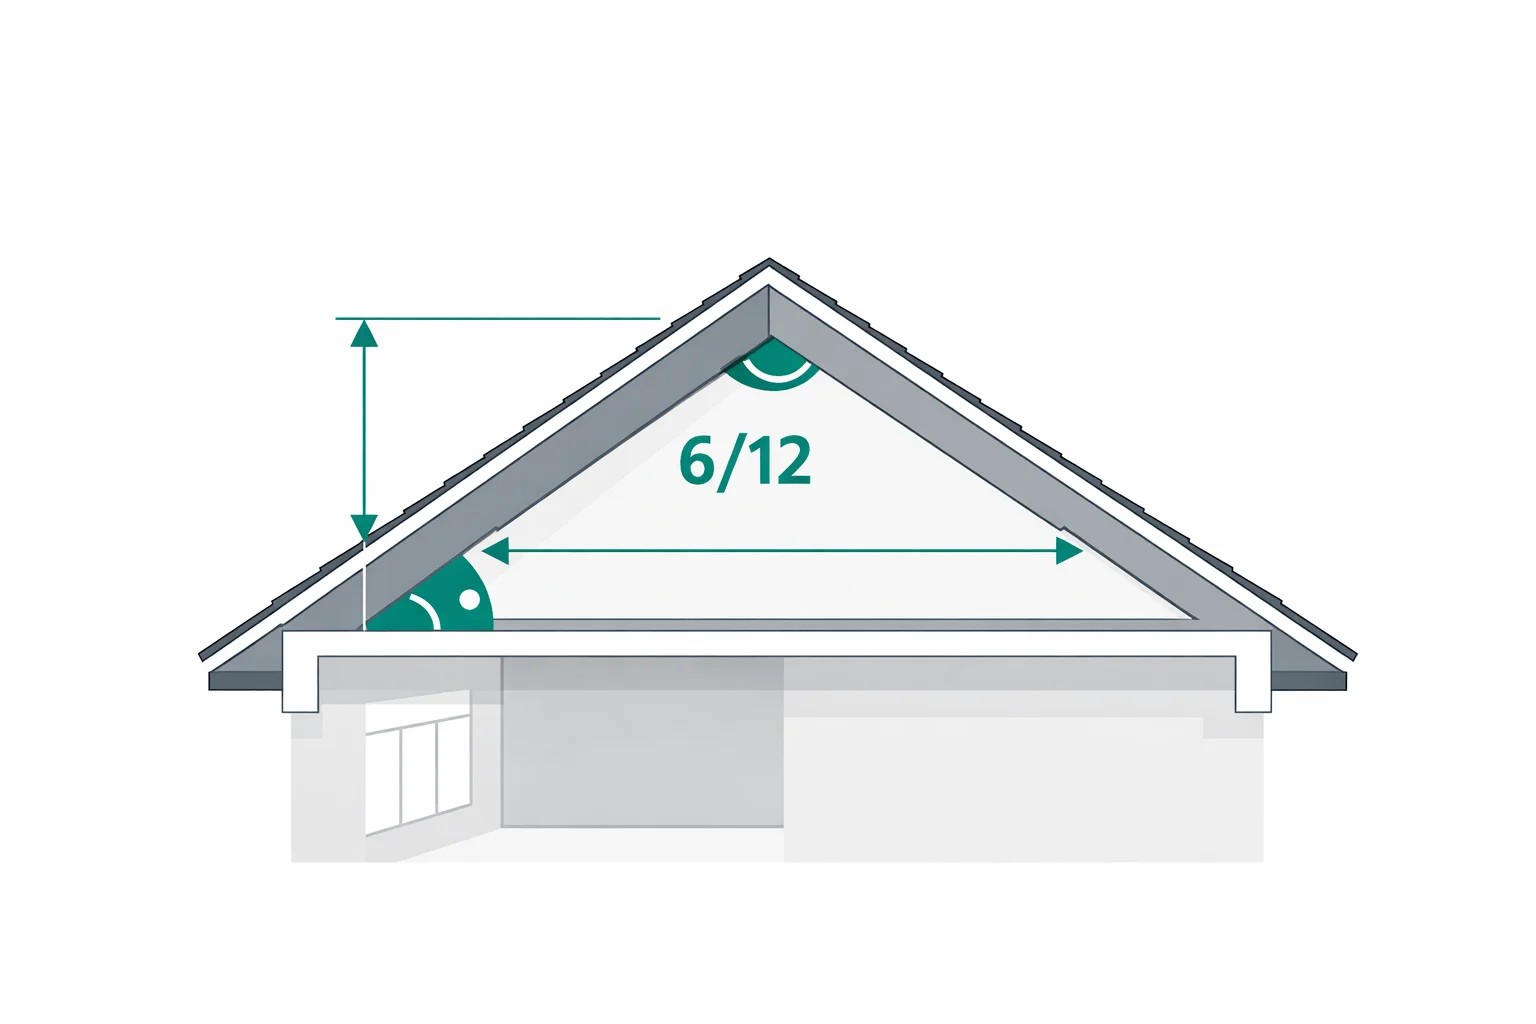
Roof pitch describes how steep a roof is. In the U.S., it's written as a ratio of rise over run — "6/12" means the roof rises 6 inches for every 12 inches of horizontal distance. A flat roof has a 0/12 pitch. A 12/12 pitch forms a 45-degree angle. Anything steeper than 12/12 exists (think church steeples), but it's rare in residential construction.
Why does pitch matter? Three reasons. First, building codes set minimum pitches for different roofing materials — asphalt shingles need at least 4/12, while membrane roofing works down to nearly flat. Second, pitch directly controls drainage speed: steeper roofs shed water and snow faster, which extends roof life. Third, pitch determines how much material you need. A 12/12 roof has 41% more surface area than a flat roof over the same footprint, so you'll buy 41% more shingles, underlayment, and flashing.
The Pitch Formula: Rise Over Run
The core formula is straightforward:
Pitch = Rise ÷ Run × 12
If your roof rises 9 inches over a 12-inch horizontal run, the pitch is 9/12. But often you're measuring a larger section — say the total rise from the top plate to the ridge is 8 feet, and the horizontal run from the outside wall to directly below the ridge is 16 feet. Convert both to the same unit (96 inches and 192 inches), then: 96 ÷ 192 × 12 = 6/12 pitch.
Converting between formats uses these relationships:
- Degrees: arctan(rise ÷ 12) × 180 ÷ π
- Percentage: (rise ÷ 12) × 100
- Pitch factor: √(rise² + 12²) ÷ 12 — this is the multiplier for calculating rafter lengths
That pitch factor deserves extra attention. It tells you how much longer a rafter is compared to the horizontal run. At a 6/12 pitch, the factor is 1.118 — so a 16-foot run needs rafters at least 16 × 1.118 = 17.9 feet long (before accounting for overhang and ridge deduction).
Worked Example: Finding Pitch From Measurements
You're re-roofing a ranch house. Standing in the attic, you measure from the top of the exterior wall (where the rafter sits on the plate) to the bottom of the ridge board: the vertical distance is 5 feet 4 inches (64 inches). The horizontal distance from the wall to directly below the ridge is 12 feet 8 inches (152 inches).
Pitch = 64 ÷ 152 × 12 = 5.05/12, which rounds to a standard 5/12 pitch. That gives you:
- Angle: 22.6°
- Slope: 42.1%
- Pitch factor: 1.083
At 5/12, standard three-tab and architectural shingles are fine without special underlayment. The roof is walkable for maintenance. If the house is 40 feet long and the run is 12.67 feet per side, total roof area is approximately 40 × 12.67 × 1.083 × 2 = 1,097 square feet — about 11 squares of shingles.
Pitch Conversion Reference Table
This table covers every standard pitch from 1/12 to 12/12. Keep it handy when talking to suppliers or reading building plans — architects often use degrees, while roofers talk in X/12 pitch.
| Pitch | Angle (°) | Slope (%) | Factor | Category |
|---|---|---|---|---|
| 1/12 | 4.8° | 8.3% | 1.003 | Low slope |
| 2/12 | 9.5° | 16.7% | 1.014 | Low slope |
| 3/12 | 14.0° | 25.0% | 1.031 | Low slope |
| 4/12 | 18.4° | 33.3% | 1.054 | Conventional |
| 5/12 | 22.6° | 41.7% | 1.083 | Conventional |
| 6/12 | 26.6° | 50.0% | 1.118 | Conventional |
| 7/12 | 30.3° | 58.3% | 1.158 | Conventional |
| 8/12 | 33.7° | 66.7% | 1.202 | Steep |
| 9/12 | 36.9° | 75.0% | 1.250 | Steep |
| 10/12 | 39.8° | 83.3% | 1.302 | Steep |
| 11/12 | 42.5° | 91.7% | 1.357 | Steep |
| 12/12 | 45.0° | 100.0% | 1.414 | Very steep |
Notice how the pitch factor grows slowly at lower pitches and accelerates at steeper ones. Going from 4/12 to 6/12 adds only 6.1% more material. Going from 10/12 to 12/12 adds 8.6%. That's why steep roofs cost disproportionately more — each additional unit of pitch piles on more material and harder labor.
Roofing Materials by Minimum Pitch
Picking the wrong material for your pitch is one of the most expensive mistakes in roofing. A contractor who installs asphalt shingles on a 2/12 roof without proper underlayment is creating a ticking leak bomb. Here's what works where:
- 0.25/12 to 3/12 (nearly flat): Built-up roofing, TPO, EPDM, or modified bitumen. These are membrane systems that seal continuous — no overlapping pieces for water to get under.
- 0.5/12 to any pitch: Standing seam metal works on everything from nearly flat commercial buildings to steep residential roofs. The seams lock together, preventing leaks even at low pitches.
- 3/12 to any pitch: Exposed-fastener metal panels. The screws need enough slope for water to flow past them without pooling.
- 4/12 and steeper: Asphalt shingles (3-tab and architectural), wood shakes, clay tile, concrete tile, and slate. Between 2/12 and 4/12, shingles can work with a full ice-and-water shield underneath, but most manufacturers won't warrant them below 4/12.
If you're on the borderline — say a 3.5/12 pitch — talk to your material supplier before ordering. Some architectural shingle brands are rated down to 3/12 with enhanced underlayment, but you need written confirmation for warranty coverage.
How Pitch Affects Roof Surface Area
Roof pitch directly multiplies the material you need. A steeper roof covers the same floor plan but with more surface area because the rafters travel a longer diagonal path. The pitch factor is the area multiplier for each side of the roof.
Example: a simple gable roof over a 32×40 foot building. The run is 16 feet per side, the ridge is 40 feet long.
- 4/12 pitch: 16 × 1.054 × 40 × 2 = 1,349 sq ft
- 8/12 pitch: 16 × 1.202 × 40 × 2 = 1,538 sq ft (+14%)
- 12/12 pitch: 16 × 1.414 × 40 × 2 = 1,810 sq ft (+34%)
That 34% jump from 4/12 to 12/12 means roughly 5 extra squares of shingles at $90-130 per square — $450-650 in shingles alone, plus matching increases in underlayment, drip edge, and labor time. Pitch also affects your framing — steeper roofs put more compression on truss top chords, which may bump lumber sizes. Run your specs through our truss calculator to see how pitch changes member sizes and cost. Then use our roofing calculator to convert your roof area into a full material shopping list with shingle bundles, underlayment rolls, ridge caps, and cost estimates.
Measuring Pitch on an Existing Roof
Three methods, ranked from most to least accurate:
Method 1: Attic measurement.Climb into the attic with a tape measure and a 2-foot level. Hold the level horizontally against a rafter, with one end touching the rafter. Measure 12 inches along the level from the rafter, then measure straight down from that 12-inch mark to the rafter. That vertical measurement is your rise. Six inches down? You've got a 6/12 pitch.
Method 2: From the roof surface.Same technique, but you're sitting on the roof with the level against the sheathing. This works fine for accessible roofs but brings safety concerns on steep slopes. Anything above 8/12 — don't climb up without proper fall protection.
Method 3: From the ground.Measure the gable end. The horizontal distance from one eave to directly below the peak is the run. The vertical distance from eave height to peak is the rise. This method is less precise because it's harder to get true plumb and level measurements from a distance, but it's safe and close enough for material ordering. A speed square or pitch-finder app can also estimate the angle when you sight along the roof edge.
Common Pitch Mistakes That Cost Money
Confusing pitch with slope in specs.An architect writes "1:4 slope" on the drawings. A contractor reads it as 4/12 pitch. But 1:4 as a ratio means 1 unit rise per 4 units run, which is actually 3/12 pitch — a full unit lower. On a 2,000 sq ft roof, that misread means ordering materials for the wrong minimum pitch requirement and potentially voiding the shingle warranty.
Measuring run to the ridge instead of the wall. The run for pitch calculation is the horizontal distance from the outside face of the wall to a point directly below the ridge — not the full distance across the building. Using the full span gives you half the actual pitch, and your rafter length calculations will be wildly off.
Ignoring the pitch when ordering materials.Flat-rate "per square foot" estimates ignore the multiplier effect. Ordering 15 squares of shingles for a 1,500 sq ft footprint seems logical, but if the roof is an 8/12 pitch, the actual surface area is 1,803 sq ft — you need 18 squares plus waste, not 15.
Mixing up degrees and pitch on the speed square.A speed square has two scales — the degree scale and the common rafter scale (pitch). Setting your saw to "6" on the degree scale instead of "6" on the pitch scale gives you a 6-degree angle (roughly 1.25/12) instead of the 26.6° angle you actually need for a 6/12 pitch cut. Always double-check which scale you're reading.
When to Use This Calculator
- Before ordering roofing materials — confirm your pitch to pick the correct shingle, tile, or membrane system and calculate total roof area accurately
- During rafter layout — convert pitch to degrees for setting miter saw angles, or use the pitch factor to calculate rafter lengths with the framing calculator
- When comparing contractor bids — verify that quotes account for actual roof surface area, not just the footprint
- For insurance or real estate purposes — some insurers adjust premiums based on roof pitch, and appraisers note it as a building characteristic
- Planning a new build or addition — decide on a pitch that balances drainage, attic space, material costs, and the neighborhood's aesthetic before breaking ground
Pitch is one of those numbers that ripples through every other calculation in a roofing project. Get it right here, and the rest — rafter sizing, material quantities, cost estimates — falls into place. Get it wrong, and you're re-ordering materials or worse, tearing off shingles that shouldn't have been installed in the first place. Take two minutes to measure twice; it'll save hours on the roof. For additional roof planning guidance, the International Residential Code (IRC) Chapter 9 covers roof assembly requirements including minimum slopes for each material type, and OSHA's fall protection standards apply when working on any roof steeper than 4/12.